Hello there!
Today I will be sharing with you how I achieve natural looking brows in just a few easy steps.
Defined brows is a defined look. Brows not only define and finish your look, they also frame your face. Starting with the perfect shape can work wonders for you!
1) SHAPING YOUR BROWS
When it comes to shaping your brows, I find it most important to just follow the natural shape of your brows.
2) FILLING YOUR BROWS
Thick, natural looking brows are easy to master. After tracing the natural shape of your brows, just fill in your brows starting at the beginning of your brows working your way to the arch of your brows, then the tail of your brows, making sure to focus on the gaps within your brows.
3) SETTING YOUR BROWS
When defining your brows, it is very important to set all your hard work in place. Set your brows with a clear or tinted brow gel for added definition.
TIP: If your brows are naturally fuller, skip filling in your brows and just comb your brow hairs in place with a tinted brow gel.
TIP: Use a brow gel slightly darker than your natural hair color to achieve naturally fuller looking brows.
I hope you found this very helpful!
Let me know what you think in the comments below! :)
-Mary
Sunday, December 28, 2014
Makeup Tip #4 | How to Achieve Natural Looking Brows
 I'm so glad you've stopped by my beauty blog! Here you'll find new content every week. Posts pertain to makeup with some random fun thrown in!!
Wednesday, December 24, 2014
Products Worth the Investment | e.l.f. Lip Balm Tints| Review + Swatches
Hello hello!!
Today I have a Products Worth the Investment review on the e.l.f. Lip Balm Tints from their Essential line.
![]()
 The shades I have are in Peach (top) and Berry (bottom).
In the pot, the product looks very highly pigmented and vibrant, but when applied, it is very sheer and beautiful.
Today I have a Products Worth the Investment review on the e.l.f. Lip Balm Tints from their Essential line.
In the pot, the product looks very highly pigmented and vibrant, but when applied, it is very sheer and beautiful.
The actual product has a thick jelly like consistency that is thick enough to not spill out of the jar...if that makes any sense. The product has a sweet candy-like smell that applies very smoothly over the lips, and (not that I puposely tasted it!) it doesn't have a noticeable taste.
**I do notice that over time, the Berry shade has a slightly odd smell and taste, but its nothing that bothers me too much.
These come in four different shades:
I love these because they leave your lips feeling very soft and moisturized, and the tint it leaves on your lips is just perfect! It adds a very beautiful and natural tint that is absolutely perfect for day-to-day wear. If you're looking for a product that is highly pigmented, vibrant, or vampy, this isn't the product for you as its name explains itself...its a tint!
The only thing I dislike about these is that they come in a pot, which means you'll have to use your fingers or a lip brush to get the actual product out of the pot.
I love using the Peach all over my lips and sometimes the Berry shade to create a soft gradient effect.

 Berry
Berry


Overall, these e.l.f. Lip Balm Tints are definitely worth the investment, especially for only $3, you can't go wrong! These are very comfortable on the lips, very moisturizing and non-sticky, and are perfect for day-to-day wear! I would definitelly repurchase these and I highly recommend it!
I hope you found this quick review helpful! Let me know what you think in the comments below!
Thanks for reading!
-Mary
**I do notice that over time, the Berry shade has a slightly odd smell and taste, but its nothing that bothers me too much.
 |
| Layered swatches of Peach on top and Berry on the bottom. These can definitely be builded up to have a slightly more vibrant color or a sheer tint. |
- Nude-pinky neutral nude (not pictured)
- Peach-peachy orange (pictured)
- Grapefruit-pinky red (not pictured)
- Berry-red (pictured)
I love these because they leave your lips feeling very soft and moisturized, and the tint it leaves on your lips is just perfect! It adds a very beautiful and natural tint that is absolutely perfect for day-to-day wear. If you're looking for a product that is highly pigmented, vibrant, or vampy, this isn't the product for you as its name explains itself...its a tint!
The only thing I dislike about these is that they come in a pot, which means you'll have to use your fingers or a lip brush to get the actual product out of the pot.
I love using the Peach all over my lips and sometimes the Berry shade to create a soft gradient effect.
Peach
Overall, these e.l.f. Lip Balm Tints are definitely worth the investment, especially for only $3, you can't go wrong! These are very comfortable on the lips, very moisturizing and non-sticky, and are perfect for day-to-day wear! I would definitelly repurchase these and I highly recommend it!
I hope you found this quick review helpful! Let me know what you think in the comments below!
Thanks for reading!
-Mary
I'm so glad you've stopped by my beauty blog! Here you'll find new content every week. Posts pertain to makeup with some random fun thrown in!!
Holiday Makeup Tutorial | Christmas Inspired Smokey Eye
Hello hello!


Thanks for reading!
Happy Holidays!!~
-Mary
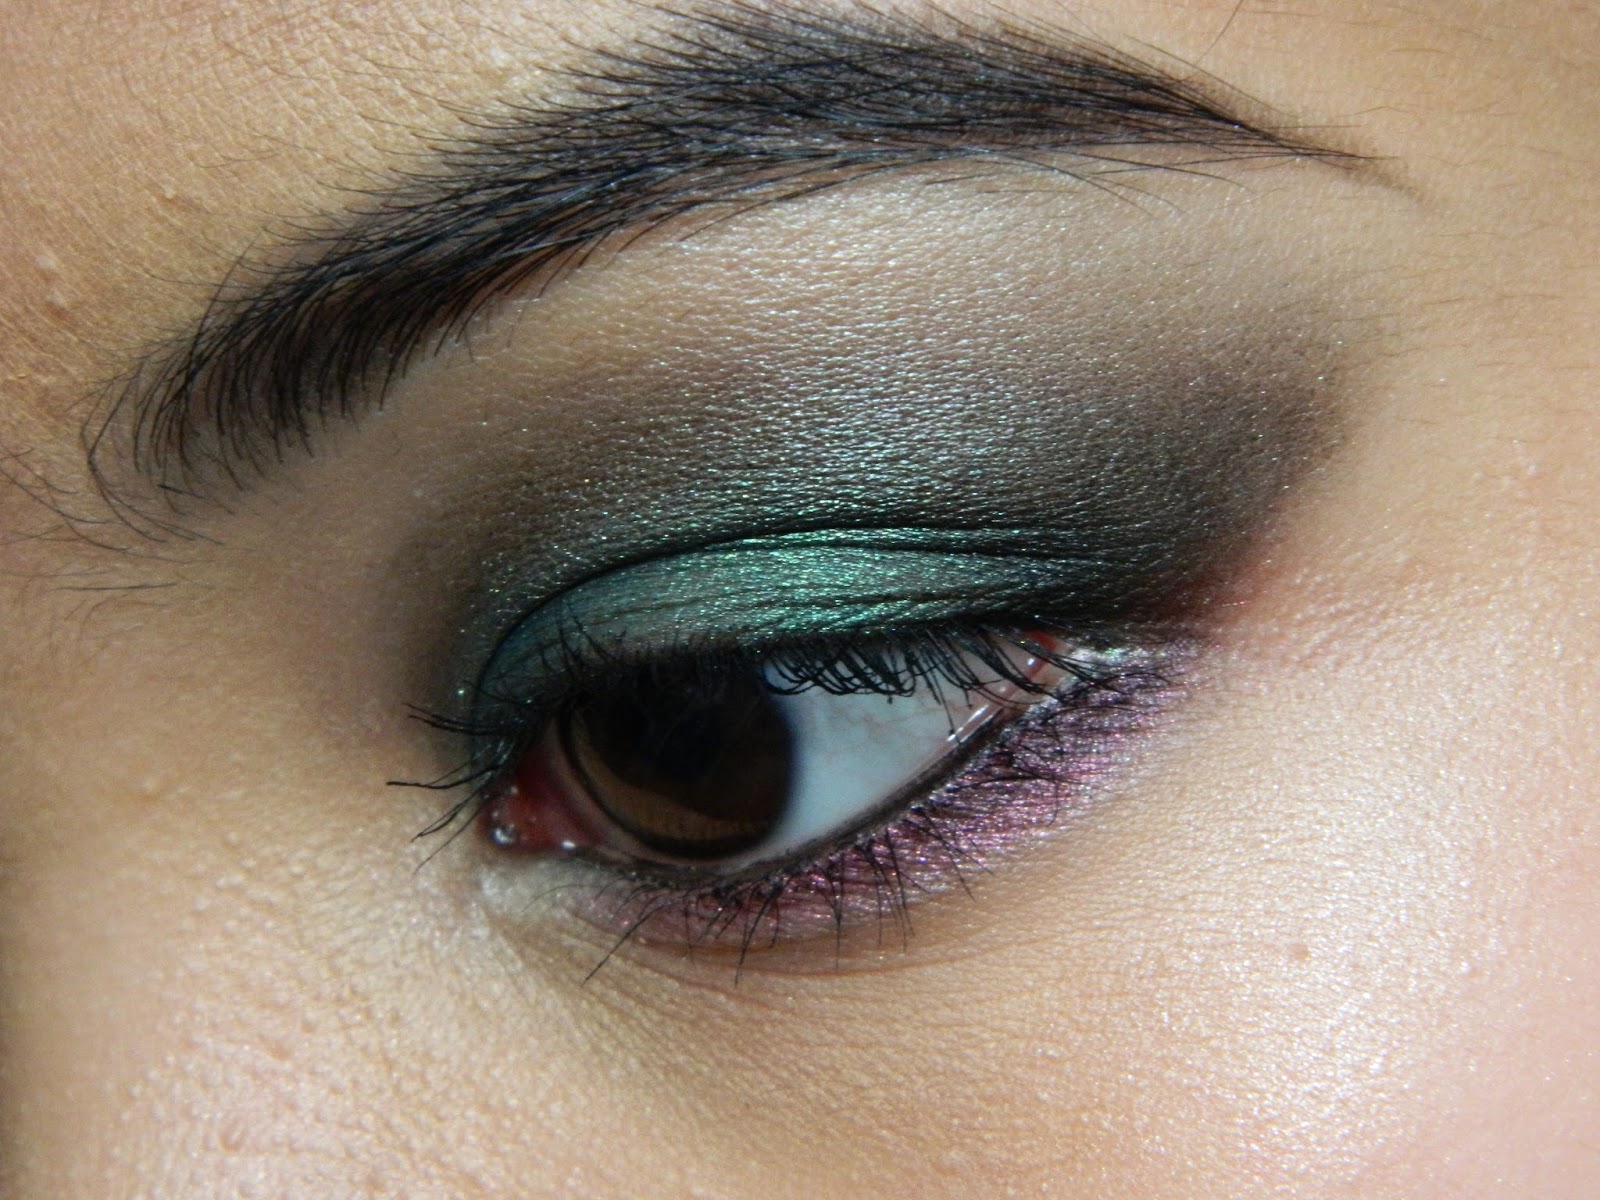
Today's makeup tutorial is on this Christmas inspired smokey eye.
 |
| Here's the final look. |
 |
With a flat shader brush, I took the fourth green shadow from the top row of the LA Colors 16 colors 'Smokey' palette and patted it all over my pre-primed lids.
TIP: Use the shadow wet to give the look a more metallic finish.
TIP: If you know you're working with shadows with tons of fallout, do your eye makeup first then rub off any fallout from your face with a makeup remover wipe then work on your face makeup and brows.
|
 |
| Using the same flat shader brush, I took the brownish charcoal shade, the last shade from the top row, and placed this on and slightly above the crease. |
 |
| Using the Real Techniques Base Shadow brush, I took the black shade from the bottom row and used this to define the outer C and crease, blending upward and outward into to previous charcoal shade and towards the brow bone. |
 |
| Using a flat shader brush, I took the magenta shade from the bottom row and used this to line one thirds of my bottom lash line and with the same brush, I took the black shadow and blended it onto the magenta shade while connecting the top shadows with the bottom shadows. |
 |
| Using the Real Techniques Duo Fiber Eye Brush, I took Beige from the Lorac PRO 2 palette (you could also use the light cream shade next to the previous magenta shade) and highlighted my inner corner and brow bone. I finished off the eye look by lining my water line and tight line with black eyeliner and topping my lashes off with a good coat of mascara. |
 |
Products used to complete this look:
Smashbox Photo Finish Primer, L'oreal True Match Mineral Powder Foundation, Benefit Hoola Bronzer, elf Pressed Blush in Wanderlust, Maybelline The Nudes Palette (black shadow for the brows), Maybelline Brow Drama in Deep Black, elf Eyelid Primer in Nude, LA Colors 16 Color Eyeshadow Palette in 'Smokey', Lorac PRO 2 Palette, Sephora 12Hour Jumbo Liner in Black, Smashbox Full Exposure Mascara, and Kat Von D Foiled love lipstick in Valentine.
|
Thanks for reading!
Happy Holidays!!~
-Mary
I'm so glad you've stopped by my beauty blog! Here you'll find new content every week. Posts pertain to makeup with some random fun thrown in!!
Sunday, December 21, 2014
Makeup Tutorial | A Classic Golden Smokey Eye
Hello hello there!!
Today I have another makeup tutorial for you on this classic, golden smokey eye...it never gets old! Plus its perfect for the holidays!
I hope you enjoy!


I hope you enjoyed this tutorial!
And if you decide to recreate this look, don't forget to share it with me, I'd love to see your recreations! :)
-Mary
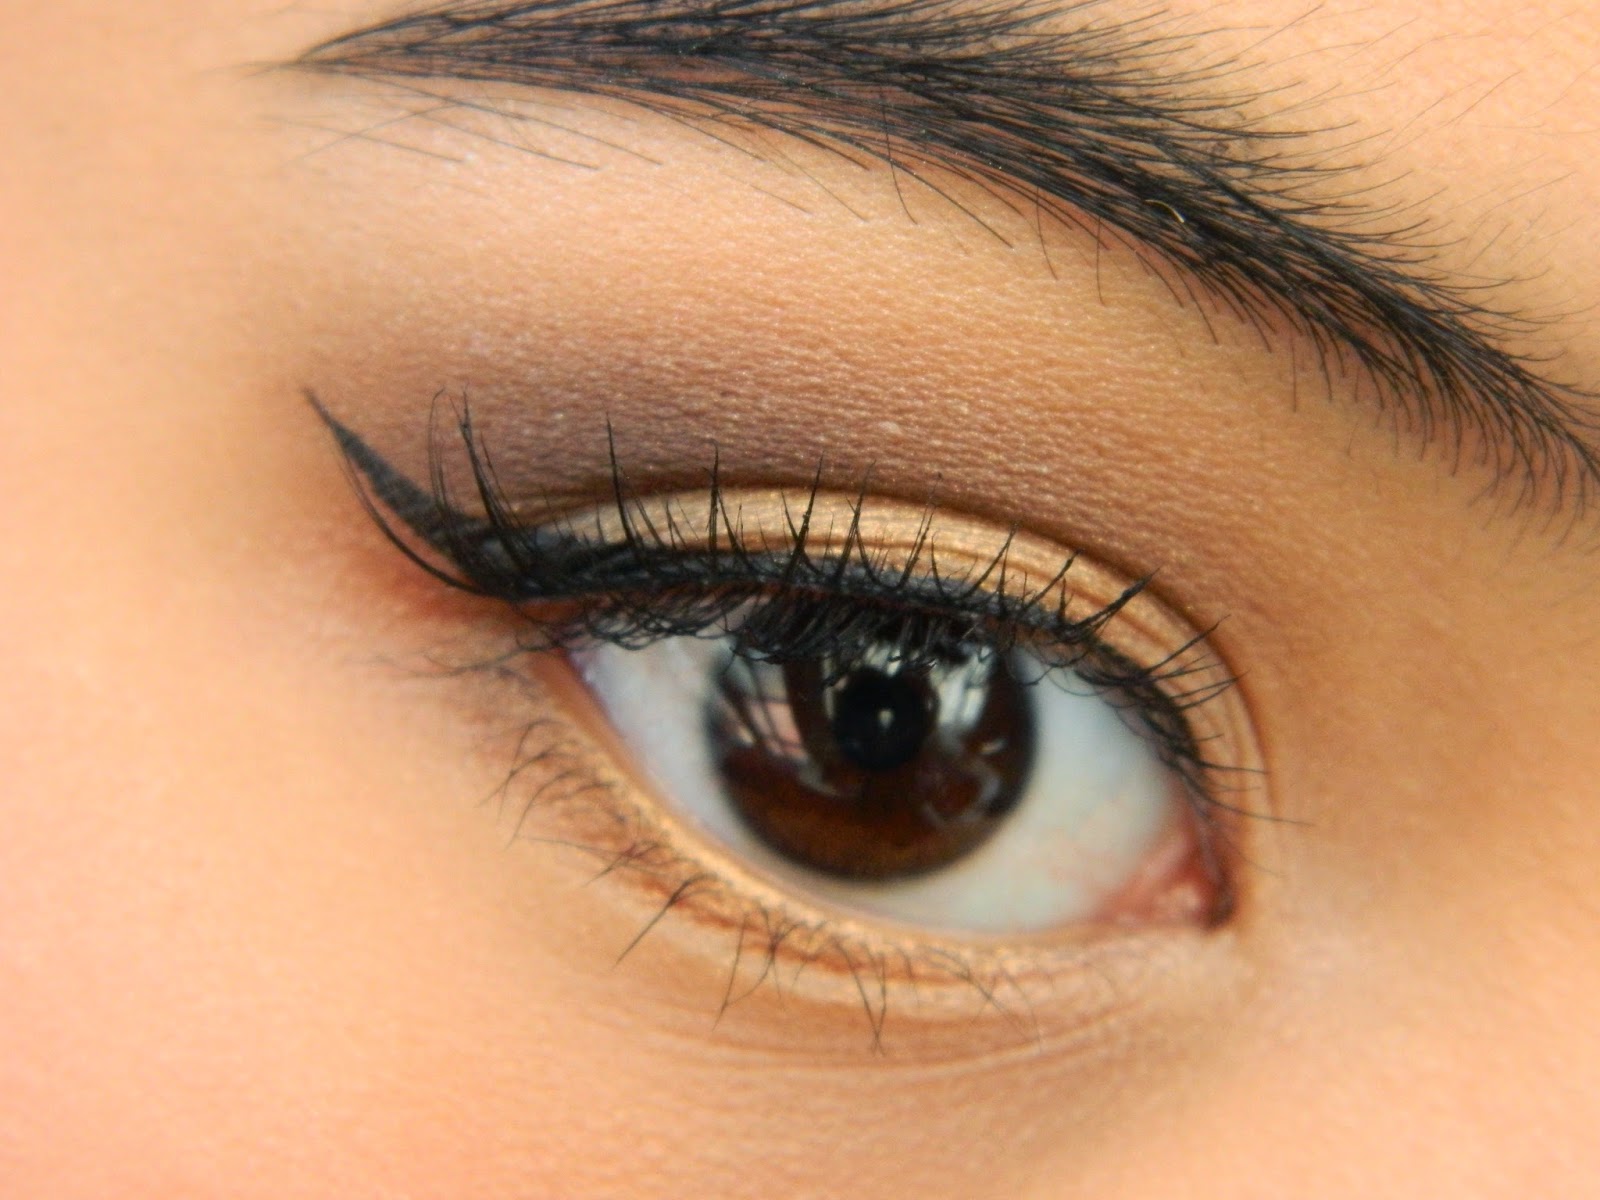
Today I have another makeup tutorial for you on this classic, golden smokey eye...it never gets old! Plus its perfect for the holidays!
I hope you enjoy!
 |
| Here's the finish eye look. |
 |
| With my lids already primed, I'm taking this Taupe shade from the Lorac Pro palette with the Real Techniques Base shadow brush and blending it along the crease and up to my browbone. |
 |
| With my e.l.f. Blending Brush, I took this Sable shade from the same palette and blended it on my crease and into the Taupe shade from the previous step. |
 |
With a flat shader brush, I took the Gold shade from the Lorac PRO Palette and placed it on the moving part of the lid.
|
 |
| I then took Pewter on the same flat shader brush and placed it on my outer Vs. |
 |
| Finally, with the Real Techniques Duo Fiber eye brush and the Nude shade, and highlighted my inner corners and browbone. |
 |
| This is optional, so if you want a cleaner look on the bottom lashline, you could skip this step. But since I wanted a smokier look, I took the shades Sable and Gold and lined my bottom lashline to match the eyeshadow on the lid. |
 |
| To finish off the eyes, I lined my eyes with a black gel liner, curled my lashes, added some mascara on the top and bottom lashes, then added some falsies of some added drama to this look. |
 |
| Here are the products I used for the rest of my face. Smashbox Photo Finish Face Primer, L'oreal True Match Mineral Powder Foundation in 'Natural Beige W4-5/464', Smashbox Photo Set Pressed Powder in 'Dark' (for bronzer), Tarte Amazonian Clay Blush in 'Flush', Lorac Pro Palette, eos lip balm, e.l.f. Eyelid Primer in Nude, e.l.f. Cream eyeliner in Black, Jordana Eyeliner in Black (brow pencil), Smashbox Full Exposure mascara, Smashbox Be Legendary Lipstick in Honey. |
I hope you enjoyed this tutorial!
And if you decide to recreate this look, don't forget to share it with me, I'd love to see your recreations! :)
-Mary
I'm so glad you've stopped by my beauty blog! Here you'll find new content every week. Posts pertain to makeup with some random fun thrown in!!
Sunday, December 14, 2014
Products worth the Investment | Maybelline BrowDrama Sculpting BrowMascara
Hello hello!
**TIP: Pick a shade darker than your natural hair to achieve fuller looking brows.
Overall, I like this Maybelline BrowDrama mascara for how well it holds my brows in place and how well it makes my brows look naturally fuller without the crunchiness! Although I like this brow mascara, I would not put this under the list of products that are worth the investment, mainly because of the brush, but its definitely worth trying out as your experience might be different from mine. I will not repurchase this as I am sure there are tons of better brow gels out there (with much better brushes). If your brows are sparse, I would recommend using a brow pencil underneath this as the actual product is very lightly pigmented.
Even if I dislike the brush, I really like the amount of product that comes off on the brush, there isn't much excess product to clean off of the brush allowing you to have full control of how much color you want to deposit on your brows...but this also means that "just a few strokes" does not do justice with giving the amount of pigment and hold I am looking for in a tinted brow gel.
I hope you found this review helpful!
Let me know what you think in the comments below! :)
-Mary
Today's Products worth the Investment review is on the Maybelline BrowDrama sculpting brow mascara that was newly released on October 2014.

 |
| A close up of the brush. I don't understand the point of having more bristles behind the ball part of the brush because no matter the angle of how you hold the brush against your brows, the bristles behind the ball part never touches your brows. Also, I feel like the ball part of the brush is too large to do precision work such as filling in the tail of your brows or filling in any gaps within your brows. |
This brow mascara claims to provide the brows with shape, color, texture, and hold with just a few strokes and is available in three shades: Deep Brown, Soft Brown, and Blonde.
**Those with brown-black hair claim that the Deep Brown shade is a bit too red, but I have black-brown hair with light brown highlights and I find that the Deep Brown shade suits me very well and gives my brows a naturally fuller look.
This brow mascara is meant to be used with a pencil underneath, but since my brows are naturally fuller, I use just the brow mascara alone.
Overall, I like this Maybelline BrowDrama mascara for how well it holds my brows in place and how well it makes my brows look naturally fuller without the crunchiness! Although I like this brow mascara, I would not put this under the list of products that are worth the investment, mainly because of the brush, but its definitely worth trying out as your experience might be different from mine. I will not repurchase this as I am sure there are tons of better brow gels out there (with much better brushes). If your brows are sparse, I would recommend using a brow pencil underneath this as the actual product is very lightly pigmented.
Even if I dislike the brush, I really like the amount of product that comes off on the brush, there isn't much excess product to clean off of the brush allowing you to have full control of how much color you want to deposit on your brows...but this also means that "just a few strokes" does not do justice with giving the amount of pigment and hold I am looking for in a tinted brow gel.
I hope you found this review helpful!
Let me know what you think in the comments below! :)
-Mary
I'm so glad you've stopped by my beauty blog! Here you'll find new content every week. Posts pertain to makeup with some random fun thrown in!!
Saturday, December 6, 2014
e.l.f. Cosmetics-Daily Moisture Stick Review
Hello hello!
Recently, specially with the cold weather, I've been trying to find a good, affordable, and portable moisturizer that I can use on my face both under or over my makeup. For a while now, I've been hearing both positive and negative reviews about this product (most negatives are due to the parabens in it), so I wanted to give it a go.
The Daily Moisture Stick from e.l.f.'s Studio line is an easy to use clear gel formula moisturizer that nourishes and hydrates your skin without leaving behind a greasy, sticky, or shiny residue.

Website Description:
Daily Moisture Stick is an easy to use clear gel formulation that nourishes and hydrates the skin. This light-weight and soothing multi-purpose balm is enriched with antioxidants and anti-aging ingredients including: Grape, Cocoa, Shea, Avocado, Macadamia, Aloe and Chamomile. The sleek, convenient packaging is perfect for travel and everyday use to condition and moisturize the skin, both at home and on the go!
My Description:
The e.l.f. Daily Moisture Stick is definitely multi-purpose and is easy to use and travel with, as stated in the website description. The product itself is a solid, clear gel formula that leaves the skin feeling cool and hydrated and it doesn't leave behind a heavy, greasy, shiny, or sticky residue. This product can be applied underneath makeup without affecting the makeup's appearance or finish...if you lay a matte foundation over a patch of this product, it will stay matte, you aren't left with a shiny or greasy patch...if you lay a mineral powder foundation over this, it won't appear shiny or greasy in that area either. I haven't applied this product to my whole entire face as a moisturizer, and I do not recommend doing so just because of all the parabens it contains and I think this product would be better to use on smaller dry patches rather than on large areas on the skin.
Website How To:
Twist up and apply to the face in a circular motion prior to makeup application. Great for use on dry or chapped hands, elbows and knees.
My How To:
Twist product up and use a clean finger to pick up some product, with your finger tips, massage the product on any dry or chapped patches. After each use, swipe the top of the product with a tissue to sanitize it.
This Daily Moisture Stick can be applied on a dry patch over makeup, just be sure to apply it with a patting motion so you won't ruin your makeup underneath.
My Recommendations:
I recommend using this product over any dry patches you have on your face, hands, feet, knees and elbows to temporarily moisturize them.
I wouldn't recommend using this product on your whole face or on large parts of your body, especially not as a DAILY moisturizer, only because of all the parabens this product contains. I haven't tried actually applying it all over my face so I can't say anything much about how it will last under a full face of makeup.
Product Ingredients: Water (Aqua), Sodium Stearate, Propylene Glycol, Glycerin, Bis-PEG-18 Methyl Ether Dimethyl Silane, PEG-150 Distearate, Sodium Chloride, Menthol, PEG-40 Hydrogenated Castor Oil, Mica, Silica, Phenoxyethanol, Vitis Vinifera (Grape) Seed Oil, Theobroma Cacao (Cocoa) Seed Butter, Tocopherol, Butyrospermum Parkll (Shea) Butter, Persea Gratissima (Avocado) Oil, Macadamia Ternifolia Seed Oil, Undaria Pinnatifida Extract, Aloe Barbadensis Leaf Juice, Magnesium Ascorbyl Phosphate, Chamaemelum Nobile (Chamomile) Extract, BHA, Methylparaben, Butylparaben, Ethylparaben, Propylparaben
In e.l.f. website this product has a 3.9 star customer rating and I do agree with that rating.
My overall thoughts and opinions for this product is that it is a great temporary moisturizer for dry patches especially during the winter season. It is great for traveling since you don't have to worry about spills and it is great to use on the go. I would definitely recommend this product to people who struggle with dry patches and for those who are on the hunt for a moisturizer that they could apply before or after their makeup on the go.
-Mary
Recently, specially with the cold weather, I've been trying to find a good, affordable, and portable moisturizer that I can use on my face both under or over my makeup. For a while now, I've been hearing both positive and negative reviews about this product (most negatives are due to the parabens in it), so I wanted to give it a go.
The Daily Moisture Stick from e.l.f.'s Studio line is an easy to use clear gel formula moisturizer that nourishes and hydrates your skin without leaving behind a greasy, sticky, or shiny residue.
 |
| "e.l.f. Daily Moisture Stick- Enriched with antioxidants and antiaging ingredients" |
 |
| It looks like a huge lipbalm! Its packaging is very similar to a typical lipbalm, except jumbo size! Its bottom twists up to expose the actual product. |
Daily Moisture Stick is an easy to use clear gel formulation that nourishes and hydrates the skin. This light-weight and soothing multi-purpose balm is enriched with antioxidants and anti-aging ingredients including: Grape, Cocoa, Shea, Avocado, Macadamia, Aloe and Chamomile. The sleek, convenient packaging is perfect for travel and everyday use to condition and moisturize the skin, both at home and on the go!
My Description:
The e.l.f. Daily Moisture Stick is definitely multi-purpose and is easy to use and travel with, as stated in the website description. The product itself is a solid, clear gel formula that leaves the skin feeling cool and hydrated and it doesn't leave behind a heavy, greasy, shiny, or sticky residue. This product can be applied underneath makeup without affecting the makeup's appearance or finish...if you lay a matte foundation over a patch of this product, it will stay matte, you aren't left with a shiny or greasy patch...if you lay a mineral powder foundation over this, it won't appear shiny or greasy in that area either. I haven't applied this product to my whole entire face as a moisturizer, and I do not recommend doing so just because of all the parabens it contains and I think this product would be better to use on smaller dry patches rather than on large areas on the skin.
Website How To:
Twist up and apply to the face in a circular motion prior to makeup application. Great for use on dry or chapped hands, elbows and knees.
My How To:
Twist product up and use a clean finger to pick up some product, with your finger tips, massage the product on any dry or chapped patches. After each use, swipe the top of the product with a tissue to sanitize it.
This Daily Moisture Stick can be applied on a dry patch over makeup, just be sure to apply it with a patting motion so you won't ruin your makeup underneath.
My Recommendations:
I recommend using this product over any dry patches you have on your face, hands, feet, knees and elbows to temporarily moisturize them.
I wouldn't recommend using this product on your whole face or on large parts of your body, especially not as a DAILY moisturizer, only because of all the parabens this product contains. I haven't tried actually applying it all over my face so I can't say anything much about how it will last under a full face of makeup.
Product Ingredients: Water (Aqua), Sodium Stearate, Propylene Glycol, Glycerin, Bis-PEG-18 Methyl Ether Dimethyl Silane, PEG-150 Distearate, Sodium Chloride, Menthol, PEG-40 Hydrogenated Castor Oil, Mica, Silica, Phenoxyethanol, Vitis Vinifera (Grape) Seed Oil, Theobroma Cacao (Cocoa) Seed Butter, Tocopherol, Butyrospermum Parkll (Shea) Butter, Persea Gratissima (Avocado) Oil, Macadamia Ternifolia Seed Oil, Undaria Pinnatifida Extract, Aloe Barbadensis Leaf Juice, Magnesium Ascorbyl Phosphate, Chamaemelum Nobile (Chamomile) Extract, BHA, Methylparaben, Butylparaben, Ethylparaben, Propylparaben
In e.l.f. website this product has a 3.9 star customer rating and I do agree with that rating.
My overall thoughts and opinions for this product is that it is a great temporary moisturizer for dry patches especially during the winter season. It is great for traveling since you don't have to worry about spills and it is great to use on the go. I would definitely recommend this product to people who struggle with dry patches and for those who are on the hunt for a moisturizer that they could apply before or after their makeup on the go.
-Mary
I'm so glad you've stopped by my beauty blog! Here you'll find new content every week. Posts pertain to makeup with some random fun thrown in!!
Sunday, November 30, 2014
Kat Von D Foiled Love Lipstick in Oh My Goth | Full Review + Swatches
Hello there!
Today's review is on the Kat Von D Foiled Love Lipstick in the shade Oh My Goth which is a beautiful metallic (or foiled) purplish brown lipstick that is just great for a vampy look for the fall and winter months!


 |
| True to color arm swatch in day light. |
 |
| True to color lip swatch in day light. |
This lipstick has such a unique shade, it is brown based with purple and pink finely milled shimmer running through it...at first, I was expecting this to be a purple lipstick, but it is actually brown with purple. This lipstick is very easy and smooth to apply, it is definitely creamy and moisturizing as well, but I find that it is dry in a way that I have to layer this on two or three times to achieve a full rich pigment that is similar to the pigment on the tube. Even after several hours of wear, I find that this does stay on very vibrantly, but after eating and drinking, you will be needing to reapply.
This lipstick could also go runny so I definitely recommend using a lip liner...I find that the perfect lip liner to go with this is NYX's 830 Currant which has that same brown based purple only without the shimmer.
Overall, I highly recommend this lipstick! It is such a unique shade that you probably don't have in your collection yet and is just perfect for the colder months!

-Mary
I'm so glad you've stopped by my beauty blog! Here you'll find new content every week. Posts pertain to makeup with some random fun thrown in!!
Saturday, November 29, 2014
Products Worth the Investment | L'oreal Voluminous Miss Manga Mascara
Hello hello there!!
Today's Products Worth the Investment review is on the new Voluminous Miss Manga Mascara by L'oreal that is supposed to amplify your top lashes and maximize your bottom lashes for the ultimate wide-eyed Manga Look.

Product Description: L'oreal Paris introduces its latest Voluminous Miss Manga mascara that provides mega lash volume from top to bottom with its unique 360 degree Flexor Brush that amplifies upper lashes while its precise cone tip maximizes lower lashes. This ultimate Miss Manga mascara provides a look of up to 15x more volume that is flake-free all day.
Claims:
Price Comparison:
Ingredients:
Aqua / Water / Eau, Paraffin, Potassium Cetyl Phosphate, Acrylates Copolymer, Cera Alba / Beeswax / Cire Dabeille, Copernicia Cerifera Cera / Carnauba Wax / Cire De Carnauba, Ethylene/Acrylic Acid Copolymer, Steareth-2, Cetyl Alcohol, Phenoxyethanol, Hydroxyethylcellulose, Acacia Senegal / Acacia Senegal Gum, Ethylenediamine/Stearyl Dimer Dilinoleate Copolymer, Sodium Dehydroacetate, Caprylyl Glycol, Hydrogenated Jojoba Oil, Hydrogenated Palm Oil, Propylene Glycol, Disodium Edta, Pentaerythrityl Tetraisostearate, Sodium Hyaluronate, 2-Oleamido-1,3-Octadecanediol, Panthenol, Silica, Soluble Collagen, Sodium Chondroitin Sulfate, Atelocollagen [+/- May Contain / Peut Contenir, Ci 77491, Ci 77492, Ci 77499 / Iron Oxides, Ci 77891 / Titanium Dioxide, Ci 77007 / Ultramarines, Ci 75470 / Carmine, Mica]
Today's Products Worth the Investment review is on the new Voluminous Miss Manga Mascara by L'oreal that is supposed to amplify your top lashes and maximize your bottom lashes for the ultimate wide-eyed Manga Look.
Product Description: L'oreal Paris introduces its latest Voluminous Miss Manga mascara that provides mega lash volume from top to bottom with its unique 360 degree Flexor Brush that amplifies upper lashes while its precise cone tip maximizes lower lashes. This ultimate Miss Manga mascara provides a look of up to 15x more volume that is flake-free all day.
Claims:
- Mega impact formula builds oversized volume for 15x lash volume in a flash
- Unique 360 degree flexible brush provides effortless application
- It's unique flat surface brush intensifies and amplifies the upper lashes while the conical shape captures the lower lashes
- Formulated with collagen spheres and polymers to ultimately volumize the lashes while retaining its curl
Price Comparison:
- Walmart: $6.97
- Target: $6.99
- Walgreens: $7.99
- CVS: $7.99
- ULTA: $7.99
Ingredients:
Aqua / Water / Eau, Paraffin, Potassium Cetyl Phosphate, Acrylates Copolymer, Cera Alba / Beeswax / Cire Dabeille, Copernicia Cerifera Cera / Carnauba Wax / Cire De Carnauba, Ethylene/Acrylic Acid Copolymer, Steareth-2, Cetyl Alcohol, Phenoxyethanol, Hydroxyethylcellulose, Acacia Senegal / Acacia Senegal Gum, Ethylenediamine/Stearyl Dimer Dilinoleate Copolymer, Sodium Dehydroacetate, Caprylyl Glycol, Hydrogenated Jojoba Oil, Hydrogenated Palm Oil, Propylene Glycol, Disodium Edta, Pentaerythrityl Tetraisostearate, Sodium Hyaluronate, 2-Oleamido-1,3-Octadecanediol, Panthenol, Silica, Soluble Collagen, Sodium Chondroitin Sulfate, Atelocollagen [+/- May Contain / Peut Contenir, Ci 77491, Ci 77492, Ci 77499 / Iron Oxides, Ci 77891 / Titanium Dioxide, Ci 77007 / Ultramarines, Ci 75470 / Carmine, Mica]
 |
| A close up of the brush. |
 |
| A close up of the 360 degree wand. |
 |
| My curled lashes without product on it. |
 |
| First Coat: Here I see some slight definition from my lashes, both top and bottom. Still zero clumps and flakes and it still held up the curl. |
 |
| Second Coat: Here is where I definitely see some volume starting to build in my lashes. Still zero clumps and flakes and although my lashes are still lifted, they aren't as curled as it was before I applied this mascara. |
 |
| Third Coat: Here is where I start to see some length in my lashes. Still zero flakes but its starting to get spidery. (I left the bottom lashes at 2 coats) |
 |
| Fourth Coat: Here is where my lashes definitely start to get spidery. Still zero flakes so I'm super impressed by that! (still left the bottom lashes at 2 coats) |
 |
| Side by side comparison of my lashes at 4 coats on top and 2 coats on bottom on the left and zero coats on the right. I think this mascara looks best at 1 coat for a natural looking definition, 2 coats for a little more dramatic lash, and 3 coats for that duper dramatic, nearly false lash effect. |
 |
| Side by side comparison of my lashes at 4 coats on top and 2 on coats bottom on the left and 1 continuous coat of building up the mascara and not giving it time to dry between coats on the right (Which I think is the best method to get the full effect of this mascara). |
 |
| Using the method of one continuous coat of building up the mascara and not giving it time to dry between coats such as the one on my right eye in the picture above is the best method to get the full effect of this mascara. I don't think doing this method gets you a manga lash, but I definitely think it gets you very close to a false lash effect. |
Overall, I think this mascara is well worth the investment and for just about $7-8 on a great mascara, you can't go wrong! This mascara comes in Black, Black Waterproof, Blackest Black, Blackest Black Waterproof, and Black Brown (for reference I have Blackest Black). What I love about this mascara is that it is a great dupe or duplicate for Benefit's They're Real mascara, but I honestly think I prefer this over Benefit's!! I love how easy it is to remove, which could be a con if you have watery eyes, but that's why they have the waterproof formula for the exact same price! I also heard this is also a great dupe for Too Faced's Better Than Sex Mascara, but I haven't tried that mascara so I can't compare the two. I highly highly recommend this mascara and I will definitely repurchase it!!
I hope you found this review helpful to you!
-Mary
I'm so glad you've stopped by my beauty blog! Here you'll find new content every week. Posts pertain to makeup with some random fun thrown in!!
Subscribe to:
Comments (Atom)